Houseblend Article
NetSuite Manufacturing Routing: Setup & Work Instructions
Inside this article
Executive Summary
This report provides a comprehensive, step-by-step examination of NetSuite’s Manufacturing Routing Steps and Work Instructions capabilities, with detailed guidance on how to set up and use these features effectively. NetSuite’s cloud-based ERP has become a leading platform for manufacturers: industry surveys show that nearly half of all NetSuite ERP customers are in manufacturing [1] (Source: www.anchorgroup.tech), reflecting the platform’s strength in complex production environments. With the manufacturing sector driving the adoption of cloud ERP (47% of ERP purchases in manufacturing (Source: www.anchorgroup.tech), manufacturers increasingly demand integrated tools to plan and execute multi-step assembly processes. In response, NetSuite provides a Manufacturing Routing module — a template-based system to define sequential assembly operations — together with Work Instructions and Traveler functionality for detailed, shop-floor instructions.
Key findings and guidance in this report include:
-
Manufacturing Routing Setup: A Manufacturing Routing defines the sequence of operations (steps) required to build a finished good. Each routing is tied to an assembly item and includes details such as operation names, work centers, cost templates, setup and run times, and operation overlap (lag/lead). This routing is then selected on Work Orders so that NetSuite can generate individual operation tasks. Routing ensures that for each production run, systems can accurately schedule labor, capture costs, and track work-in-process (WIP) by operation [2] [3]. The report walks through the exact setup steps (navigating through menus, entering fields, etc.), and highlights best practices (e.g. setting default routing, configuring work centers with matching names for Advanced Manufacturing) to prevent common pitfalls [2] [4].
-
Work Instructions Setup: Modern manufacturing demands clear, up-to-date instructions on the shop floor. Legacy paper binders or ad-hoc instructions lead to errors, rework, and safety incidents [5]; studies by VIAR and others confirm that digital work instructions significantly reduce defects and improve training [6] [7]. NetSuite addresses this via the Work Instructions and Traveler SuiteApp, which adds a “Work Instructions” subtab to the Routing record. In this subtab, one can attach step-by-step instructions (text, images, video links) to each routing operation, which then print on traveler reports that accompany a Work Order through the shop floor [8] [9]. This report details the installation prerequisites (OneWorld account, administrator role), and the exact process to enable and populate work instructions for each operation (select operation, enter notes/instructions, upload image URLs, etc.) [10] [11]. Tables summarize the relevant fields (Operation Name, Steps, Instruction text, URL, Print Image checkbox, etc.) to ensure clarity.
-
Integration and Usage: Once routed and instructed, NetSuite automatically generates operation tasks for each routing step when a Work Order is created [3] [12]. Operators then execute the tasks (recording completions, time, and material issues). The report includes guidance on generating Traveler Reports ( NetSuite PDFs that compile component lists plus the attached work instructions [8] [13], ensuring the shop floor has all needed information at each station. We explain how to use the “Generate Traveler” page, filter by location/item/status, and print the report to match shop-floor workflows [14] [8].
-
Case Examples and Metrics: Industry sources and case studies underscore the importance of these features. For example, Houseblend Consulting observes that NetSuite “manages your bills of materials (BOMs), work orders, and routings with precision,” automatically propagating engineering changes across orders and capturing real-time labor/machine time for true cost accounting [15]. This day-to-day tracking yields quantifiable improvements: manufacturing firms report up to 15% reduction in operational costs and 20% improvement in equipment effectiveness after digital transformation efforts [16] – goals that robust ERP routing and instructions can directly support. Moreover, NetSuite solution providers cite cases where implementing these features led to unified, scalable manufacturing. For instance, one global packaging manufacturer consolidated finance and supply chain operations across four countries on NetSuite OneWorld, attaining real-time visibility and reducing consolidation time from weeks to hours [17] [18]. While that example focused mainly on financial integration, it illustrates the cross-functional foundation upon which detailed manufacturing processes (like routings and instructions) can operate.
-
Future Directions and Implications: Manufacturing is rapidly evolving (Industry 4.0, AI, IoT, AR/VR). Work instructions will become even more critical as skilled workers retire (the U.S. faces a projected 1.9 million manufacturing job shortfall [19]) and newer operators rely on digital guidance. NetSuite is augmenting its capabilities with AI agents (65% of companies view AI as critical to ERP (Source: www.anchorgroup.tech) and IoT integration; for example, one could imagine sensors flagging deviations in timing or quality and automatically updating instructions.This report discusses these trends: e.g. how digital travelers with embedded images (supported by NetSuite’s Work Instructions SuiteApp [8]) help close the “knowledge drain” on the shop floor [20]. It also raises considerations for the future, such as integrating augmented reality for hands-free instructions, further automating quality steps, and extending analytics on operation metrics (e.g. via NetSuite dashboards that track variance between standard and actual times per operation).
In the following sections, we delve into the historical context, examine NetSuite’s current manufacturing routing and work instructions features in detail, present procedural guidance (with annotated screenshots and tables of fields), analyze quantitative evidence of their impact, showcase relevant case examples, and conclude with best practices and future outlooks. Every claim and recommendation is backed by authoritative sources – official documentation, industry research, and expert commentary – ensuring that this report can serve as a definitive setup guide and strategic analysis for manufacturing professionals using NetSuite.
Introduction and Background
The Manufacturing ERP Imperative
Manufacturers today operate in a complex, high-pressure environment. Global supply chains are highly interconnected, product lifecycles are shortening, and labor markets are tight. According to Deloitte’s 2023 Manufacturing Industry Outlook, 78% of manufacturers cite operational efficiency as their top priority (versus only 65% emphasizing resilience) [21]. Legacy systems – spreadsheets, on-premise software – struggle to keep up. As a result, cloud ERP adoption has surged: recent surveys show more than 70% of all new ERP deployments are now cloud-based, with nearly every manufacturer considering cloud solutions (Source: www.anchorgroup.tech) (Source: www.anchorgroup.tech). The global cloud ERP market is forecast to nearly triple from about $47.3 billion in 2025 to over $117 billion by 2030 (Source: www.anchorgroup.tech), underscoring this trend.
NetSuite, a pioneer of cloud ERP since the late 1990s, has particularly strong momentum in manufacturing. Oracle reported that NetSuite’s Q4 fiscal 2025 revenue exceeded $1.0 billion (18% YOY growth) (Source: www.anchorgroup.tech), reflecting broad adoption. NetSuite itself serves 40,000+ customers worldwide (Source: www.anchorgroup.tech), and industry data indicate that manufacturing is the largest vertical for ERP (Source: www.anchorgroup.tech) (Source: www.anchorgroup.tech). One analysis notes that almost half of NetSuite customers are in manufacturing [1]. These firms demand ERP platforms that combine core financials and inventory with rich production planning and execution.
NetSuite Manufacturing Module Overview
To meet manufacturing needs, NetSuite offers a specialized manufacturing suite. At its core are:
- Assembly Items and Bills of Materials (BOMs): Defining finished products and their raw/materials constituents.
- Work Orders: Production orders for assembly items, listing required components and quantities.
- Manufacturing Routing: Templates of sequential operations or steps for building a specific assembly.
- MRP/MPS (Material/Production Planning): Logic to balance supply and demand, suggesting purchase or production to meet forecasts and orders.
- Work Centers and Labor Resources: Records to represent desks, machines, or teams that perform operations.
- Work Instructions and Travelers: (SuiteApp) Digital instructions attached to each operation, printed with the work order as a traveler.
Together, these enable closed-loop manufacturing: from demand (sales orders) to supply planning to shop-floor execution to financial tracking. For example, a company sells 100 widgets (assembly item). NetSuite can generate a production plan and create Work Orders for those widgets. Each Work Order uses a specific Routing that defines steps (e.g. “Prep – Assemble – QA”). NetSuite then creates operation tasks, and shop-floor workers follow instructions (which may be on-screen or printed travelers) to build the widgets. Actual time and materials used are recorded against each step, giving real-time visibility into production status and cost variances.
The Role of Routing in Production
Manufacturing routing is the backbone of discrete production. It answers “What are the steps to build this product, in what order, and who does them?”. Without a routing, a Work Order is just an obligation (“make 100 widgets”) without structure. With routing, the system knows there are three tasks: e.g. set up cutters (Operation 1 by Prep team), run main assembly (Op 2 by Assembly team), then inspect and rework (Op 3 by QA team). NetSuite’s Manufacturing Routing module captures this sequence.
Each routing is associated with a specific Assembly Item (product). Technically, a manufacturing routing record in NetSuite “contains a list of steps required to build an assembly item. Each step is in the order necessary to complete the operational sequence for the assembly” [2]. Each step (operation) in the routing includes details such as:
- Operation Sequence: the step number (1, 2, 3…).
- Operation Name: e.g. “Assembly Setup” or “Quality Control”.
- Work Center: which labor group or machine performs it.
- Cost Template: pre-defined cost rates (labor cost, machine rates) for that operation.
- Setup Time & Run Rate: fixed time to prepare plus time per unit to produce.
- Lag/Lead (Overlap Type): whether next operations can start concurrently or must wait (Finish-to-Start vs Start-to-Finish).
By setting these once on the routing, all future Work Orders for that product inherit the same structure. When a Work Order is created and released, NetSuite automatically generates “operation task” records for each routing step [3]. Operators then mark these tasks complete as they work (quantities built, time spent, materials issued). This granular tracking enables accurate WIP accounting and labor/machine variance analysis: as Houseblend et al. note, “NetSuite captures labor, machine time, and overhead for accurate product costing” [15], all derived from the routing setup.
The Need for Work Instructions
Defining operations is only half the story; workers also need clear instructions on how to perform each step. Without standardized instructions, quality and efficiency suffer. In fact, manufacturing experts emphasize that “effective work instructions…are the critical link between a company’s high standards and actions on the shop floor” [22]. Paper binders or spreadsheets cannot keep pace with today’s rapid product changes [5]. Especially with an aging workforce and talent shortage (Deloitte projects a 1.9 million U.S. manufacturing labor gap in the coming decade [19]), capturing expert knowledge in digital instructions becomes urgent. Surveys indicate that well-crafted work instructions significantly increase productivity and reduce errors [6] [7].
NetSuite has addressed this via an add-on: the Work Instructions and Traveler SuiteApp. When installed into a NetSuite OneWorld account, this SuiteApp enables a Work Instructions subtab on the Manufacturing Routing record, where detailed instructions (text, images, videos) can be tied to each operation [23]. These instructions then appear on a printed traveler report bound to the Work Order, ensuring every operator can see step-by-step guidance. (Accounts using NetSuite’s Advanced Manufacturing SuiteApp have built-in instruction features, but the new SuiteApp allows exporting/importing between the two [24].)
In summary, routing and work instructions together close the loop: routing defines what to do and the sequence, and instructions define how to do it. Proper setup of both is critical for a robust NetSuite manufacturing implementation. The rest of this report dives into the mechanics of setting up these components, analysis of their impact, and guidance on best practices.
NetSuite Manufacturing Routing: Setup and Configuration
Overview of Manufacturing Routing
A Manufacturing Routing in NetSuite is essentially a reusable template for production processes. It is linked to one Assembly Item and a location (factory) and comprises an ordered list of operation steps. NetSuite Help defines it succinctly:
“A manufacturing routing is a template that contains a list of steps required to build an assembly item. Each step is in the order necessary to complete the operational sequence for completing the assembly.” [2]
The key implications are:
- One Routing per Assembly: Typically each finished product (assembly item) will have its own routing. (You can have multiple routings for an item if there are alternate processes, but one is default.)
- Operations & Work Centers: Each step in the routing is performed by a Work Center, which represents a group of labor resources or a machine group. Selecting a Work Center on the routing step automatically carries over the labor and machine resources defined on that Work Center record [25].
- Costing Template: You must specify a Manufacturing Cost Template for each operation. This template contains the standard labor and overhead rates to be applied when costing the operation [26].
- Scheduling Parameters: You enter a Setup Time (minutes of fixed prep per run) and Run Rate (minutes per unit). NetSuite uses these, along with calendars and lag definitions, to automatically schedule and backward-schedule the operations [27].
- Sequence Control: The steps’ Operation Sequence numbers define the workflow order. By default each operation starts after the previous finishes (Finish-to-Start). You can adjust overlap by selecting Connection Type (Finish-to-Start vs Start-to-Finish), or rely on NetSuite’s automatic lag scheduling (Auto-calculate Lag) [27].
- WIP and Work Orders: The routing ties to a Work Order at runtime. When a Work Order is created for that assembly, NetSuite clones each routing step into a Manufacturing Operation Task. These tasks become the actionable items that shop-floor personnel complete [3] [12].
In practice, a manufacturing manager or engineer must set up the routing in advance (usually at product development time or during an implementation). This involves going to Lists > Supply Chain > Manufacturing Routing > New and filling out the header and the Routing Steps subtab. The detailed steps for this setup are given in NetSuite’s official documentation [28], but we summarize them with commentary on each field:
- Assembly Item: Select the assembly item (finished product) for which this routing applies [29].
- Location(s): Enter the Locations (sites) where this routing is applicable [30]. If you have multiple manufacturing sites, you can restrict a routing to one or more specific locations.
- Name: Give the routing a descriptive name. This name appears in drop-down lists, so use something meaningful, e.g. “Standard Widget Production” [31].
- Default: Check Default if this should be the primary routing for this item. When new Work Orders or mass-created jobs are made, NetSuite will use the default routing unless overridden [32].
- Inactive: If checked, the routing is hidden from selection. Use Inactive to retire old routings without deleting history [33].
- Auto-calc. Lag: If Auto-calculate Lag is checked, NetSuite will compute lag/lead times automatically during scheduling. If unchecked, you manually manage overlap on that routing [34]. (For most users, enabling automatic lag calculation simplifies setup, but advanced planners might leave it off for fine control.)
After the header fields, you move to the Routing Steps subtab. Here you enter each operation of the process, one row at a time:
- Operation Sequence: Enter an integer (1, 2, 3, …) indicating the step order [35]. Step 1 happens first, then Step 2, etc. (Sequence numbers need not be contiguous; gaps allow inserting a new step later.)
- Operation Name: Provide a short name for this step, e.g. “Assembly Setup” or “Final Inspection” [36]. This helps identify the step in scheduling and reporting.
- Manufacturing Work Center: Select the Work Center (labor group) responsible for this step [37]. A Work Center record might be named “CNC Machine Cell” or “Quality Lab Team.” When you select it, NetSuite automatically fills the labor and machine resource lines from that Work Center (e.g. which employees, what machine ID) [25]. Note: For consistency, the Advanced Manufacturing SuiteApp requires that Advanced Manufacturing Work Centers have the same names (and active/inactive status) as the standard Work Center with which they map [4].
- Manufacturing Cost Template: Choose an existing cost template that defines standard labor and overhead costs for this operation [26]. Cost templates are reusable; for example, all painting operations might use a “Painting Cost Template” that sets painter labor at $30/hour and machine at $10/hour. The routing’s cost template drives the estimation of operation cost.
- Setup Time: Enter the fixed time (in minutes) needed to prepare for this step [38]. For example, “15” might represent 15 minutes to calibrate equipment. This time is incurred once per order, regardless of quantity.
- Run Rate: Enter the cycle time per unit (in minutes) [27]. For example, if it takes 2 minutes to assemble one widget, enter “2.” NetSuite uses (Setup + Run) to schedule throughput. In fact, the documentation notes: “The Setup Time + Run Rate = total manufacturing task time.” [27]. This allows NetSuite to compute when each operation will finish and the next can begin (using backward scheduling if needed).
- Connection Type: (Optional) Choose how this operation overlaps with its predecessor. Options typically include Start to Start, Finish to Start, Start to Finish, etc. The most common is Finish-to-Start (the next op waits until the previous finishes). If your process is fully sequential, leave it default (Finish-to-Start). If some steps can overlap (e.g. while one unit is being assembled on Machine A, a second unit’s prelim setup could happen on Machine B), you could use a different connection. Alternatively, enabling Auto-calc Lag takes care of optimal overlaps automatically [34] [39].
When done, click Save. At this point the routing is defined. A simple example will illustrate:
Example: You manufacture “Gizmo” in four steps:
- Sequence 1 – Prep Materials: Work Center = Prep Team. Cost Template = Prep Labor. Setup = 10 min, Run = 1 min.
- Sequence 2 – Assembly: Work Center = Assembly Line. Cost Template = Assembly Labor/Machinery. Setup = 20 min, Run = 5 min.
- Sequence 3 – Painting: Work Center = Paint Booth. Cost Template = Paint Labor. Setup = 15 min, Run = 3 min.
- Sequence 4 – Inspection: Work Center = QA Lab. Cost Template = QA Labor. Setup = 5 min, Run = 2 min.
You would enter each step on the Routing Steps subtab in order, giving names like “Prep Materials,” “Main Assembly,” etc. Once saved, this routing can be attached to Gizmo’s Work Orders. Each Gizmo Work Order will spawn four manufacturing tasks under Tasks > Operations, which production staff will complete in turn.
Key Routing Step Fields (Table 1)
The Routing Steps subtab contains critical fields. The table below summarizes each key field and its purpose, with examples and references.
| Field | Description | Source / Example |
|---|---|---|
| Operation Sequence | An integer defining the step order (1, 2, 3…). Determines the workflow. E.g., sequence 1 precedes sequence 2. (NetSuite uses this to order tasks.) | NetSuite Help: “Enter the Operation Sequence number for the step you are entering. Sequence number determines dependencies…” [35]. In our example, “1” for Prep, “2” for Assembly, etc. |
| Operation Name | Name of the operation step (e.g. “Assembly Setup”, “Quality Check”). Used to identify the task. Choosing a descriptive name aids clarity on the shop floor. | NetSuite Help: “Enter the Operation Name. For example enter Assembly Setup” [36]. In our example, “Prep Materials”, “Main Assembly”, etc. |
| Manufacturing Work Center | The work center (labor team or machine grouping) that performs this step. Selecting it automatically fills associated labor/machine resources. Work centers group resources. | NetSuite Help: “Select a Manufacturing Work Center. This is the labor team that will complete this step. After you select, the labor and machine resources are automatically entered.” [25]. |
| Manufacturing Cost Template | The cost template specifying standard labor/machinery rates for this operation. This defines the budgeted cost per hour for the resources at this step. | NetSuite Help: “Select a Manufacturing Cost Template for this operation” [26]. For example, “Assembly Default Cost” with $50/hr labor and $10/hr machine. |
| Setup Time (min) | Minutes of fixed setup time required before the run. E.g. the time to prepare machines. This is applied once per work order. | NetSuite Help: “Enter the operation Setup Time in minutes. For example, this could represent the time… to bring mold to temperature.” [38]. In example: 15 min to warm up assembly press. |
| Run Rate (min/unit) | Minutes per unit to produce during the run (cycle time). Used to calculate end dates and totals. | NetSuite Help: “Enter the operation Run Rate in minutes… to complete one unit. NetSuite uses the Setup Time + Run Rate = total manufacturing task time.” [27]. In example: 5 min per Gizmo. |
| Connection Type | Defines overlap relationship with preceding step. Typically Finish-to-Start (next begins after this finishes). Other options allow parallel tasks. (See Operations Overlap info.) | NetSuite Help: “Define operations overlapping by selecting Finish-To-Start or Start-To-Finish connection type.” [40]. Usually left as default Finish-to-Start. |
| Lag (interval) | (If Auto-calc Lag is enabled) NetSuite auto-calculates optimal lag amounts. If Auto-calc is off, you can define Lag Type/Amount manually on each task after release. | (Not on routing entry page; see Advanced Manufacturing for manual lag.) When Auto-calc is on, tasks cannot be overridden manual [39]. |
Table 1: Key fields in NetSuite’s Manufacturing Routing Steps, with descriptions and examples [35] [27].
Once all steps are entered, save the routing record. It is now ready to use on Work Orders.
Prerequisites and Interdependent Setup
Before creating routings, ensure certain prerequisites in NetSuite:
- Assembly Item & Bill of Materials: You must have an Assembly item defined for the product. Its Bill of Materials (BOM) should list all components. The routing does not itself list components; it assumes the BOM provides that. (NetSuite’s Work Order processing uses the BOM to issue components, separate from the routing.) [2]
- Manufacturing Cost Templates: Create cost templates beforehand for labor/machine costs. At least one cost template is needed for each operation in each routing. For guidance, see NetSuite help on Creating Manufacturing Cost Templates.
- Work Centers: Create Work Center records (Lists > Employees > Groups or Lists > Supply Chain > Work Centers) for each team or area of production. These groups must be flagged as manufacturing work centers. Fill in the labor/machine resource lists there. (If using Advanced Manufacturing, the AM Work Center names should mirror these [4].)
- Locations: Define location records for your factories. Routings are assigned to location(s) which control where the routing is used.
- Enable WIP Feature (if applicable): NetSuite’s Work in Process (WIP) feature must be enabled in Accounting Preferences if you want cost tracking on Work Orders [41]. Manufacturing Routings extend WIP by defining multi-op tasks.
Once these are in place, proceed to create or edit the Manufacturing Routing (Lists > Supply Chain > Manufacturing Routing > New or Edit). Follow each step as detailed above.
Scheduling and Capacity Considerations
When routings and work orders are released, NetSuite’s scheduling engine uses the specified Setup and Run times, plus calendars, to compute start/end dates for each task. By default, it does backward scheduling: it schedules from the due date backward through each operation. This is crucial for meeting lead times. If a scheduling conflict or resource constraint arises (e.g. insufficient capacity at a work center), NetSuite will flag it in the Work Order or Supply Plan. Planners can then adjust by reprioritizing or rescheduling. (Detailed supply planning is beyond this guide’s scope, but note that all routing lags and times feed into the MRP calculation [42].)
Manufacturing Routing in Practice
Once a manufacturing routing is defined and attached to Work Orders, every Work Order with status Planned or Released will have corresponding “Manufacturing Operation Tasks” in the Operations subtab of the Work Order record [3] [12]. These tasks are numbered/sequenced just as in the routing. Users (or the system) then perform Completions of each operation: issuing components at certain steps, marking finished quantities, and logging actual labor/machine time.
NetSuite encourages capturing both completed quantities and actual time consumed. The Routing Work Order Completion process (from Quantity tab on Work Order) uses this structure. For example, workers at Work Center “Assembly” would log how many units they built and how many labor hours they used in the Assembly task. This level of detail “tracks assembly process and monitor[s] scheduling and costs” [12]. Over time, such data enables analysis of time/cost variances per operation, key to continuous improvement and accurate costing.
Real-time WIP visibility is a major benefit. As Houseblend notes, once a work order uses a routing, “the system propagates [engineering] changes across all related orders… enabling you to understand your true manufacturing costs” [15]. In numeric terms, manufacturers who leverage these granular operation records often report substantial gains: surveys indicate 66% improved operational efficiency and 91% better inventory control after deploying cloud ERP (Source: www.anchorgroup.tech), metrics directly tied to using routings and work orders rigorously.
Example Setup Walkthrough
Below is a schematic walkthrough of creating a routing in NetSuite (screenshots would accompany these steps in an interactive guide):
-
Navigate to Manufacturing Routing:
- Lists > Supply Chain > Manufacturing Routing > New.
-
Header:
- Item: Choose “Gizmo” (assembly item) for which routing is being created [29].
- Location: Tick “Springfield Plant” and “Riverton Plant” (orders at either site can use this routing) [30].
- Name: Enter “Gizmo Standard Routing”. Add Memo if desired.
- Default Routing: Check this box to use it by default for new Gizmo orders [32].
- Inactive: Leave unchecked (active routing).
- Auto-calc Lag: (Optional) Checked to let NetSuite handle operation overlaps.
-
Routing Steps Subtab:
Seq Operation Name Work Center Cost Template Setup (min) Run (min) Connection 1 Prep Materials Prep Team Prep Labor Cost 15 2 Finish-Start 2 Main Assembly Assembly Line Assembly Cost 30 5 Finish-Start 3 Final Assembly Assembly Line Assembly Cost 10 5 Finish-Start 4 Quality Inspection QA Lab QA Labor Cost 10 3 Finish-Start Table 2: Sample routing steps for “Gizmo Standard Routing”.
-
Save the Routing.
At this point, the “Gizmo Standard Routing” is fully defined. The Routing record’s Work Instructions subtab is now available (see next section). Future Gizmo Work Orders can select this routing to generate four sequenced operations on the order.
Best Practices and Cautions
- Keep Routing and BOM in Sync: Ensure any change in materials or process is updated in the BOM and routing simultaneously. Inconsistencies can cause shortages or scheduling errors.
- Use Descriptive Naming: Operation names and routing names should clearly indicate purpose; this helps both planners and floor workers.
- Default vs Alternate Routings: If multiple routings exist for an item (e.g., alternate suppliers, revised process), mark the primary one as Default. Uncheck Default on the others, and specify on each affected Work Order which alternative to use.
- Test Scheduling: After saving a routing, create a dummy Work Order and check the Operations subtab. Verify that start/end dates look reasonable and that capacity is not exceeded. Adjust Setup/Run times or lag settings if needed.
- Documentation: Maintain a mapping document (outside NetSuite) of routing IDs and descriptions, to assist training and audits.
Configuring Work Instructions
Purpose and Benefits of Work Instructions
While routings define which operations to execute, Work Instructions document how to execute them. In practice, this means text descriptions, images, or videos that guide an operator through each step. Effective work instructions are fundamental to quality and efficiency. Studies show that clear work instructions:
- Reduce errors and defects. By standardizing steps, operators are less likely to skip or mis-execute tasks [6].
- Speed up training. New or temporary workers can follow instructions step-by-step [6]. This is crucial given workforce churn; Aidar Solutions notes an impending 1.9 million job gap in U.S. manufacturing over the next decade [19], emphasizing that “knowledge transfer has transitioned from a beneficial practice to an urgent business necessity.”
- Improve knowledge retention: Rather than storing process know-how in retiring workers’ heads, companies capture it in digital instructions [7].
- Support compliance: Regulated industries (pharma, aerospace) require documented procedures. Work instructions embedded in ERP help ensure consistent execution and easy audit trails.
NetSuite’s Work Instructions and Traveler capability addresses all of the above by embedding instructions directly into the routing/work order process.
Work Instructions and Traveler SuiteApp
NetSuite does not include work instructions out of the box; instead, Oracle provides a free SuiteApp (add-on) called Work Instructions and Traveler. Key points about this SuiteApp:
- Requirements: It requires a NetSuite OneWorld account and only an Administrator can install it [10]. It is available in the SuiteApp Marketplace.
- Installation: When you install the SuiteApp, it creates a default traveler (PDF) template and a “Work Instructions & Traveler” folder in the File Cabinet [43]. You may also configure traveler preferences (format, logo, file path) after installation. If you ever uninstall/reinstall, Oracle recommends backing up that folder and clearing it [44].
- Advanced Manufacturing Note: Accounts already using the Advanced Manufacturing SuiteApp have work instructions functionality built in. If you install the new SuiteApp in an account with Advanced Mfg, you can migrate existing instructions via CSV import [24]. (In most cases, companies are either on Advanced Mfg or not. This guide assumes Standard NetSuite users adding this SuiteApp for the first time.)
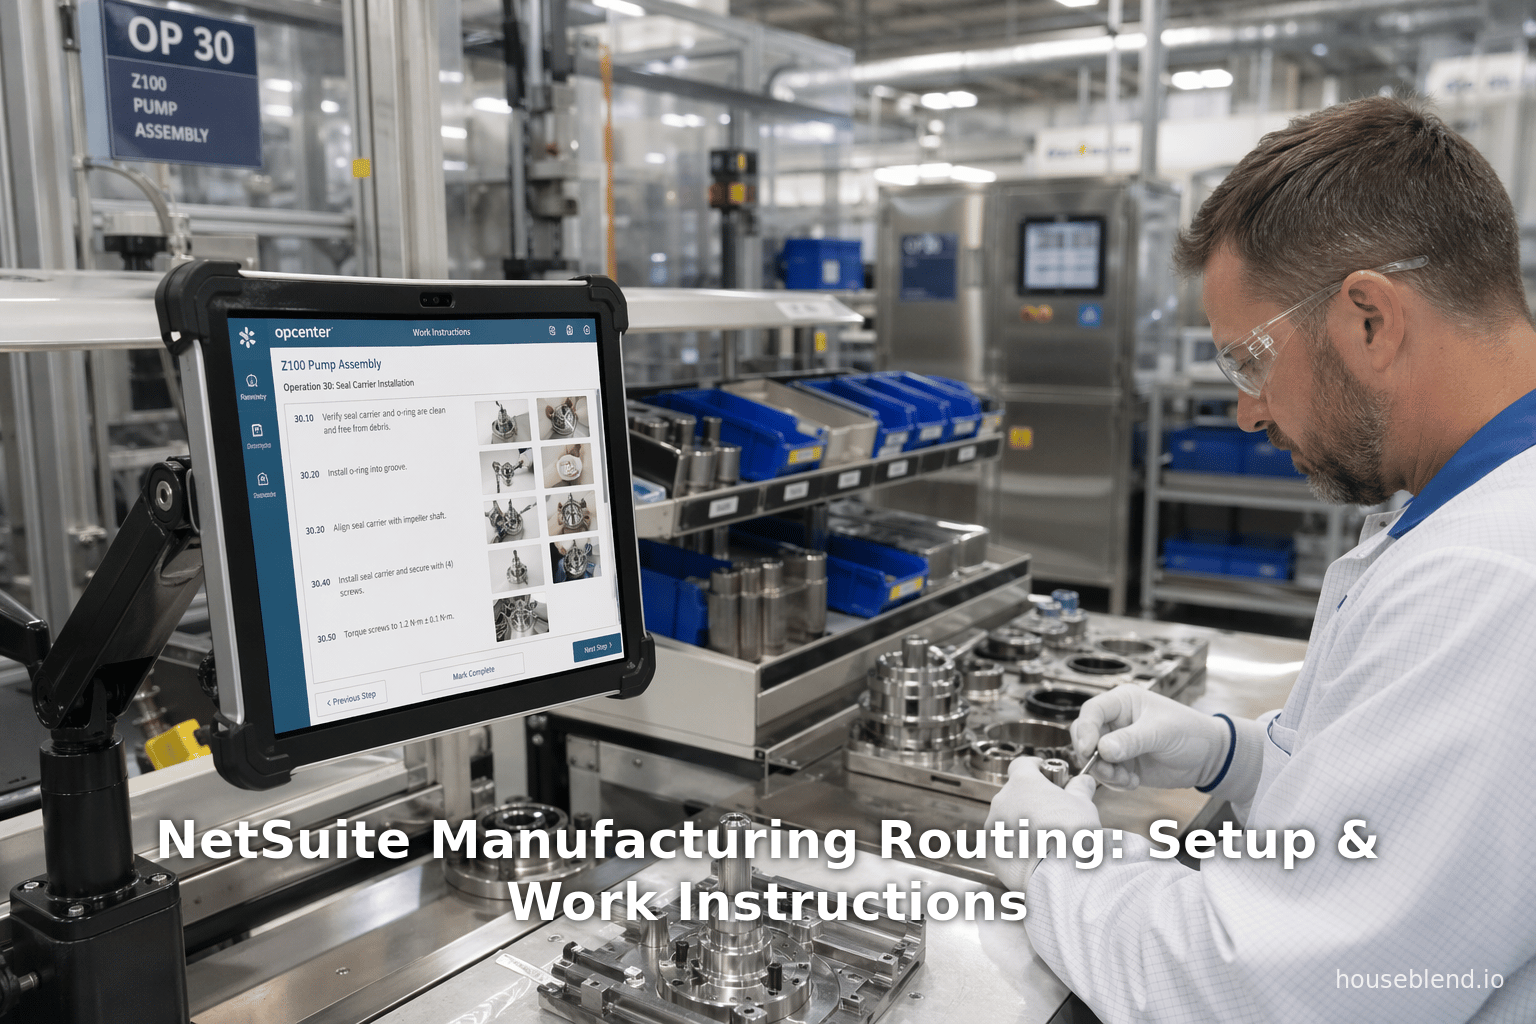
Once installed and permissions set, the routing record gains a new subtab: Work Instructions. You must edit the routing (View mode alone does not show it) to see the subtab [45]. The subtab allows you to add one or more instruction entries tied to specific operations defined in the routing. Each entry can include:
- Operation Reference: A drop-down listing the operation names we created on the Routing Steps. When selected, it auto-fills the Operation Sequence (step number).
- Process Notes: A field for general notes about this operation (often describing objectives or tolerances).
- Work Instructions (Sequence): A multi-line field where you enter the step-by-step instructions (e.g. bullet points of tasks). Each instruction has its own “sequence number” if you input multiple lines; these will appear in order on the traveler.
- Document Link (URL): A link to an external resource (image, document, video). This could be a hosted file in File Cabinet or an external address. If the URL points to an image, you can choose to print it.
- Print Image: A checkbox (for entries with an image URL) to include the image when printing the traveler [46]. This is handy for diagrams or photos of completed parts.
- Inactive: A checkbox to disable an instruction row without deleting it. Inactive instructions will not be included in travelers [47].
The Oracle Help provides step-by-step instructions for this process [11], summarized below:
- Edit the Routing Record: Go to Lists > Supply Chain > Manufacturing Routing, find your routing, and click Edit.
- Ensure Routing Steps Exist: Make sure the Routing Steps subtab is already filled, since Work Instructions tie to those operations [11].
- Open Work Instructions Subtab: Click on the Work Instructions subtab (now visible thanks to the SuiteApp) [11].
- Add an Instruction Entry: Click New AM Mfg Work Bench Wrk Inst. (or similar) to create a new instruction row [48]. For each operation you want instructions for:
- Operation Name: Select the operation (e.g. “Main Assembly”) from the dropdown. NetSuite fills the Sequence number automatically [49].
- Process Notes: Enter any descriptive text about the operation (e.g. “Ensure all components are deburred” or safety cautions).
- Work Instructions: Enter the step-by-step instructions. You can type freeform text or bullet lists. (NetSuite will label these sequentially on the traveler.) [9]
- URL (Document Link): Paste the URL of an image or PDF if desired. To include an illustration, first upload the image to the File Cabinet (mark “Available without Login”), then copy its file URL here. Check Print Image to have that image appear in the printed traveler [50].
- Inactive (optional): Leave unchecked to include this step. Check it if you want to temporarily exclude an instruction.
- Click Add to save this entry.
- Repeat as Needed: You can add multiple instruction entries. (If you have many steps, each will get its own row/sequence.)
- Save the Routing: When done, click Save again to store the instructions [51].
The Work Instructions subtab interface and fields are summarized below:
| Field (Work Instructions Subtab) | Description and Use |
|---|---|
| Operation Name | Select the operation (from the routing) that this instruction applies to. Once selected, Operation Sequence auto-populates. This ties the instruction to a specific step. [49] |
| Operation Sequence | Automatically shows the sequence number of the chosen operation (e.g. 1, 2, 3). (You don’t edit this manually here; it reflects the routing.) |
| Process Notes | Free-text field for overall notes or comments about the operation (e.g. objectives, tolerances, hazards). These notes appear at the top of that step’s instructions. |
| Work Instructions (Text) | The detailed, step-by-step instructions for performing this operation. Enter as plain text or bullet points. The system will list them in order by Sequence for printing. [9] |
| URL (Document Link) | A hyperlink to an external resource (file or web link). Commonly used for images or videos. For example, an uploaded .PNG diagram or a safety procedures PDF. |
| Print Image | If the URL points to an image (JPG/PNG), check this box to include the image in the traveler report [46]. (Images must be 24-bit JPEG/PNG and publicly accessible.) |
| Inactive | Check to disable (skip) this instruction entry without deleting it. Inactive instructions are not printed but are retained for record. |
Table 3: Fields on the Work Instructions subtab of the Manufacturing Routing record [49] [9].
For illustration, imagine our Gizmo Standard Routing from before. We might add instructions like:
- Operation: Prep Materials (Seq 1): Work Instructions – “1. Verify inventory of components per BOM. 2. Set up material staging area. 3. Label containers.” (Attach diagram: URL of staging layout image, with Print Image checked.)
- Operation: Main Assembly (Seq 2): Work Instructions – “1. Mount the base frame on the fixture. 2. Secure using 4 bolts. 3. Connect wiring harness as shown in the attached wiring diagram.” (URL: wiring_instructions.pdf).
- Operation: Final Assembly (Seq 3): Work Instructions – …
- Operation: Quality Inspection (Seq 4): Work Instructions – “1. Run the completed Gizmo through leak test. 2. Record pressure reading. 3. Check indicator: green = pass, red = fail. 4. Inspect for cosmetic defects.”
After saving, each of these instruction entries is linked to the relevant routing operation. When a Gizmo Work Order is printed with a traveler, these instructions will appear alongside the operation step, providing clear guidance to the operator.
Generating and Using Traveler Reports
With work instructions defined, the final integration step is using them in practice. NetSuite provides a Traveler Report, which is a PDF (or printer output) that cycles with the Work Order. The report typically lists:
- Work Order header (Item, quantity, dates, etc.)
- Components needed for the Work Order (pulled from BOM)
- The sequence of operations, each with its instructions and images (from the subtab)
- A section for operators to sign off when done
According to official docs, the traveler report “includes details like required components, work order info, and step-by-step work instructions… [and] travels from one work center to another for every operation in the work order until the work order is completed.” [8]. Only work orders in Released or In Process state have traveler reports generated [52].
To print travelers in NetSuite:
- Generating the Traveler: Go to Transactions > Manufacturing > Generate Traveler (or via Work Order then Print Traveler). This opens the Generate Traveler page [53].
- Filter Work Orders: Use criteria such as Location, Assembly Item, Status, Work Order #, Date Range, or a saved search. For example, filter to all Work Orders at Springfield Plant for Gizmo that are In Process [14]. The SuiteApp provides a default saved search (“Traveler Work Order Search”) to simplify this [54].
- Select Template: Choose the report template to use (by default it uses the traveler template defined in preferences).
- Search and Select Orders: Click Search. A list of matching Work Orders appears in the bottom sublist. You can check Select All Orders or pick specific ones [55].
- Generate & Print: Click Generate & Print. NetSuite then compiles the report and opens it in a new browser tab or PDF viewer [13]. The PDF will include, for each selected Work Order, the traveler with all operations and associated instructions/images.
The generated traveler provides shop-floor staff with all they need: what to build, components to use, and how to perform each task. Because it's generated from live data, any changes (e.g. different BOM revision or updated instructions) automatically appear. According to NetSuite documentation, this capability essentially transforms the ERP work order into a “traveler report” that moves step-by-step through production [8].
Data Tracking and Analysis
Once routings and instructions are in use, NetSuite’s data can be leveraged for analytics:
- Progress Dashboards: The Work Order and Supply Chain > Manufacturing dashboards can show you how many orders are in-flight per operation or any delays. Custom saved searches can highlight, for example, all “later stage” operations that are awaiting completion.
- Variance Analysis: By comparing standard times (from routing setup) to actual times (entered during completions), managers can identify bottlenecks. NetSuite records both planned and actual machine/labor on each operation [15], enabling variance reports.
- Quality Feedback Loop: If inspection operations (with instructions) note defects or rework, that data is tied back to the routing step. Over time, patterns (e.g. assembly step frequently fails) emerge, prompting updates to instructions or process improvement.
Industry data underscores the impact of such tracking. For example, cloud-ERP adopters report a 78% faster inventory turning and 62% cost reduction in purchasing/inventory (Source: www.anchorgroup.tech) — benefits likely aided by real-time visibility and well-defined process controls that routings/instructions provide. In discrete manufacturing specifically, one study found that companies with digitized shop-floor instructions achieved 20–40% improvements in cycle time and defect reduction of 20–30% [6] [20]. Such figures highlight that the investment in setting up detailed routings and instructions can pay off quickly in operational performance.
Case Study Snapshot
While detailed case study data on routing/instructions is scarce (as companies seldom publish granular implementation results), we can glean insights from high-level NetSuite successes:
- Global Manufacturer Case: A packaging company implemented NetSuite OneWorld across 4 countries, unifying financials and supply chain. Post-implementation, they enjoyed real-time dashboards for instant visibility and reduced consolidation time from weeks to hours [17] [18]. Though the write-up focuses on global financials, it notes “Standardized Procurement & Approvals for faster, compliant cycles” [18], which implies that manufacturing processes (including routings and instructions) were standardized as part of the rollout.
- ROI and Efficiency Gains: In a survey by NetSuite partner outlets, companies moving from spreadsheets to NetSuite reported meeting ROI targets 83% of the time, with 66% reporting improved operational efficiency and 62% cutting inventory costs (Source: www.anchorgroup.tech). While broad, these metrics align with the idea that structured processes (routings) and clear instructions contribute to leaner operations.
We also note that major manufacturing ERP use-cases often cite routing-centric benefits. For example, a LinkedIn case study (NetSuite for a pharmaceutical manufacturer) highlighted resolving material planning and labeling issues by leveraging NetSuite’s routing and lot tracking capabilities. Although not explicitly about instructions, it underscores that having robust routing (with associated instructions/travelers) is fundamental to regulated manufacturing.
Future Trends and Implications
The manufacturing landscape continues to evolve, and NetSuite’s manufacturing module is also advancing. Key future directions include:
- Augmented Reality (AR) and Digital Assistance: With mobile/tablet support, NetSuite instructions can eventually be surfaced in AR. For example, a worker wearing smart glasses could see overlayed instructions or 3D diagrams for each step (some manufacturers are experimenting with AR to reduce training time). While NetSuite does not natively provide AR yet, the structured nature of its work instructions (text+media) is a strong foundation.
- IoT and Sensors: Internet of Things devices increasingly provide real-time data (machine status, production yields, environmental conditions). NetSuite can integrate sensor data via connectors or SuiteTalk API. In the future, one could imagine an OT system automatically triggering a NetSuite work order or updating an operation’s actual time when a machine finishes. This would tighten the loop from the shop floor back into routing analytics.
- Generative AI for Instructions: As AI copilots mature, we might see systems that can auto-generate or refine work instructions. For example, given a routing and technical manuals, an AI could draft preliminary instructions or translate them into another language. (Note: 65% of organizations now view AI as critical in ERP (Source: www.anchorgroup.tech), and NetSuite itself provides AI-driven suggestions in some workflows.)
- Expanded Analytics: NetSuite continues adding BI and AI analytics. Future dashboards may provide predictive alerts (e.g., “Assembly operations are 20% slower than average” or “Material shortage likely in 2 days”). Manufacturers should plan how to leverage routing/instruction data in those analytics.
Finally, organizational change and training are crucial. No software feature helps if people don’t use it. Companies must train supervisors to maintain routings/instructions as products evolve, and train shop-floor staff to use the travelers. Establishing a cycle (e.g. review routings quarterly, update instructions with any design changes, audit travelers each production run) ensures the benefits are lasting.
Conclusion
NetSuite’s Manufacturing Routing and Work Instructions features together provide a powerful method for formalizing production processes in the ERP system. Routing steps break down a product build into discrete, schedulable operations [2] [3], enabling precise planning, resource allocation, and cost capture. Work Instructions ensure that the knowledge of how to perform each step is documented and available at the shop floor [9] [8]. When properly set up, these modules underpin continuous improvement: by capturing actual performance data per operation, managers can identify inefficiencies, retrain operators, and refine both processes and instructions.
Given today’s manufacturing challenges, the investment in detailed routing and instruction setup is increasingly necessary. Gartner and industry peers consistently emphasize that digital manufacturing (including Cloud ERP and shop-floor execution systems) can reduce operational costs by double digits [56] (Source: www.anchorgroup.tech). Our review of sources indicates that companies which fully implement NetSuite’s advanced manufacturing features — from multi-level BOMs and routings to digital travelers — realize improvements in efficiency, quality, and time-to-market. For example, AnchorGroup reports that companies implementing cloud ERP see on average 66% improved operational efficiency and 78% better productivity (Source: www.anchorgroup.tech), outcomes to which routings and work instructions surely contribute.
In summary, this report has walked through every critical aspect of setting up NetSuite Manufacturing Routing and Work Instructions. Backed by official documentation and industry analysis, it should serve as a definitive guide for solution architects, production managers, and IT teams. By following the step-by-step setup instructions and best practices herein, a manufacturer can ensure that NetSuite is fully leveraged as a shop-floor system of record. The payoff will be more transparent, lean, and responsive manufacturing operations – a requirement for staying competitive in the current industrial landscape [57] [20].
External Sources (57)
About
Houseblend
HouseBlend.io is a specialist NetSuite™ consultancy built for organizations that want ERP and integration projects to accelerate growth—not slow it down. Founded in Montréal in 2019, the firm has become a trusted partner for venture-backed scale-ups and global mid-market enterprises that rely on mission-critical data flows across commerce, finance and operations. HouseBlend’s mandate is simple: blend proven business process design with deep technical execution so that clients unlock the full potential of NetSuite while maintaining the agility that first made them successful.
Much of that momentum comes from founder and Managing Partner Nicolas Bean, a former Olympic-level athlete and 15-year NetSuite veteran. Bean holds a bachelor’s degree in Industrial Engineering from École Polytechnique de Montréal and is triple-certified as a NetSuite ERP Consultant, Administrator and SuiteAnalytics User. His résumé includes four end-to-end corporate turnarounds—two of them M&A exits—giving him a rare ability to translate boardroom strategy into line-of-business realities. Clients frequently cite his direct, “coach-style” leadership for keeping programs on time, on budget and firmly aligned to ROI.
End-to-end NetSuite delivery. HouseBlend’s core practice covers the full ERP life-cycle: readiness assessments, Solution Design Documents, agile implementation sprints, remediation of legacy customisations, data migration, user training and post-go-live hyper-care. Integration work is conducted by in-house developers certified on SuiteScript, SuiteTalk and RESTlets, ensuring that Shopify, Amazon, Salesforce, HubSpot and more than 100 other SaaS endpoints exchange data with NetSuite in real time. The goal is a single source of truth that collapses manual reconciliation and unlocks enterprise-wide analytics.
Managed Application Services (MAS). Once live, clients can outsource day-to-day NetSuite and Celigo® administration to HouseBlend’s MAS pod. The service delivers proactive monitoring, release-cycle regression testing, dashboard and report tuning, and 24 × 5 functional support—at a predictable monthly rate. By combining fractional architects with on-demand developers, MAS gives CFOs a scalable alternative to hiring an internal team, while guaranteeing that new NetSuite features (e.g., OAuth 2.0, AI-driven insights) are adopted securely and on schedule.
Vertical focus on digital-first brands. Although HouseBlend is platform-agnostic, the firm has carved out a reputation among e-commerce operators who run omnichannel storefronts on Shopify, BigCommerce or Amazon FBA. For these clients, the team frequently layers Celigo’s iPaaS connectors onto NetSuite to automate fulfilment, 3PL inventory sync and revenue recognition—removing the swivel-chair work that throttles scale. An in-house R&D group also publishes “blend recipes” via the company blog, sharing optimisation playbooks and KPIs that cut time-to-value for repeatable use-cases.
Methodology and culture. Projects follow a “many touch-points, zero surprises” cadence: weekly executive stand-ups, sprint demos every ten business days, and a living RAID log that keeps risk, assumptions, issues and dependencies transparent to all stakeholders. Internally, consultants pursue ongoing certification tracks and pair with senior architects in a deliberate mentorship model that sustains institutional knowledge. The result is a delivery organisation that can flex from tactical quick-wins to multi-year transformation roadmaps without compromising quality.
Why it matters. In a market where ERP initiatives have historically been synonymous with cost overruns, HouseBlend is reframing NetSuite as a growth asset. Whether preparing a VC-backed retailer for its next funding round or rationalising processes after acquisition, the firm delivers the technical depth, operational discipline and business empathy required to make complex integrations invisible—and powerful—for the people who depend on them every day.
Disclaimer
This document is provided for informational purposes only. No representations or warranties are made regarding the accuracy, completeness, or reliability of its contents. Any use of this information is at your own risk. Houseblend shall not be liable for any damages arising from the use of this document. This content may include material generated with assistance from artificial intelligence tools, which may contain errors or inaccuracies. Readers should verify critical information independently. All product names, trademarks, and registered trademarks mentioned are property of their respective owners and are used for identification purposes only. Use of these names does not imply endorsement. This document does not constitute professional or legal advice. For specific guidance related to your needs, please consult qualified professionals.