Houseblend Article
NetSuite Carrier Integration & Ship Central Setup Guide
Learn how to set up NetSuite carrier integrations for UPS, FedEx, and ShipEngine. This guide covers step-by-step registration and rate shopping configuration.
Inside this article
- 01Executive Summary
- 02Introduction and Background
- 03UPS Integration
- 04FedEx Integration
- 05Ship Central (ShipEngine) Integration
- 06Shipping Preferences and Advanced Configuration
- 07Comparison: Native vs. Third-Party Solutions
- 08Data Analysis and Case Studies
- 09Discussion: Implications and Future Directions
- 10Conclusion
Executive Summary
NetSuite’s integrated shipping solutions have evolved significantly. Originally, NetSuite’s Shipping Label Integration allowed direct connections to legacy carriers (UPS, FedEx, USPS/Endicia) so that orders could be rated and labeled within NetSuite. However, Oracle now designates NetSuite Ship Central (launched circa 2022–2023) – powered by a built-in ShipEngine account – as the standard for new implementations [1] (Source: www.anchorgroup.tech). As of 2026, NetSuite copperates with ShipEngine (soon rebranded as ShipStation API [2]) to unify carrier accounts and automate shipping workflows. For existing customers on legacy integration, Oracle continues limited support but encourages migrating to Ship Central [1] (Source: www.anchorgroup.tech).
This report provides a comprehensive guide to setting up NetSuite carrier integrations and rate-shopping:
- UPS Integration – Registering your UPS account, enabling features, creating UPS shipping items, and printing labels.
- FedEx Integration – Registering FedEx accounts (with FedEx’s MFA steps), enabling shipping integration, and configuring FedEx shipping items.
- ShipEngine/Ship Central Integration – Creating the NetSuite ShipEngine account, connecting multiple carriers (UPS, FedEx, USPS, plus others like DHL), and enabling the NetSuite Ship Central plug-in.
- Rate Shopping Setup – Using Ship Central’s Shop for Rates (or “Get Rates”) and NetSuite’s Multiple Shipping Routes to compare real-time rates across carriers and select the best option per shipment (e.g. cheapest vs fastest) [3] [4].
Detailed configuration steps, background context, and expert insights are provided for each area. Industry perspectives and data (e.g. case studies showing reduced shipping costs via integration [5]) are integrated throughout. All claims are backed by NetSuite documentation and recent expert analyses [1] [6] [4] (Source: www.anchorgroup.tech) [5].
Introduction and Background
Effective shipping automation is critical for NetSuite ERP users. Manually calculating rates and creating labels outside the ERP is time-consuming and error-prone. NetSuite’s Shipping Label Integration and Ship Central modules address this by bridging NetSuite with carrier services. Historically, NetSuite’s native integration (pre-Ship Central) supported real-time rates and label printing for UPS, FedEx, and USPS/Endicia [1]. However, Oracle’s strategy has shifted: new customers use Ship Central, which leverages an embedded ShipEngine account to connect to carriers (including UPS, FedEx, USPS, DHL, etc.) [6] (Source: www.anchorgroup.tech). Legacy FedEx/UPS integrations remain only for accounts created before Ship Central’s rollout [1] (Source: www.anchorgroup.tech).
The key goals of carrier integration are to automate rate quoting, label generation, and shipment tracking within NetSuite. As one industry analyst notes, integration “automatically generates [shipping] labels based on order details, saving ... time while reducing human error” [7]. Another highlights real-time multi-carrier rate comparisons so shippers “compare costs and select the most affordable option for every shipment” [8]. Stewart et al. comment that at high order volumes, carrier integration can dramatically cut fulfillment time: the “per-shipment processing [drops] from manual steps to automated workflows” (Source: www.anchorgroup.tech). Indeed, one case study found automating carrier selection in NetSuite cut shipping costs by ~74% [5]. These savings underscore the business value of deep integration.
Below we review the current state and setup procedures for UPS and FedEx in NetSuite, explain NetSuite’s Ship Central (ShipEngine) account management, and detail multi-carrier “rate shopping” configuration. We also consider historical context (older legacy integration), alternative SuiteApps, and future implications (e.g. ShipEngine’s 2025 rebranding [2]).
UPS Integration
Overview and Prerequisites
Integrating UPS with NetSuite allows real-time rate quoting, automatic charging of the UPS account, barcode label printing, and tracking updates directly in NetSuite. The NetSuite help states: “UPS Integration enables you to connect your NetSuite account directly to your UPS account” [9]. When an order is fulfilled using an UPS-integrated shipping item, the UPS charges post to the UPS account and the tracking number is saved on the Item Fulfillment record [9].
Prerequisites: Before integrating, you must have an active UPS account with permissions for real-time rates (i.e. Web Services access). Note your UPS account number if you’ve already registered for real-time rates, as NetSuite will require it [10]. Generally, one should also enable NetSuite’s Shipping Label Integration feature and set UPS as a default carrier (if desired) before proceeding [11] [12].
Enabling UPS in NetSuite1. Enable Shipping Label Integration: In NetSuite, go to Setup > Company > Enable Features, then under the Transactions subtab check Shipping Label Integration, and save [11]. This activates the integrated shipping functionality across UPS, FedEx, USPS (for legacy integration) or Ship Central (for new accounts).
- Default Carrier Setup (Optional): Under Setup > Accounting > Shipping, set UPS as the Default Shipping Carrier and save [12]. (This ensures UPS is pre-selected on new orders but is not strictly required.)
- Register UPS Account: In NetSuite, navigate to Setup > Accounting > Shipping, and use the Carrier Registration subtab (legacy integration) or Shipping Items setup (Ship Central) to add your UPS credentials. For legacy integration, click Add UPS Account, read/accept the UPS terms, and fill in your account details (see below) [13]. For Ship Central, instead add UPS under the ShipEngine settings (next section).
- Unit Roles: Perform these steps with an administrator or a custom role that has Set Up Shipping and Manage Shipping Labels permissions.
Registering the UPS Account
Through the UPS help section, NetSuite provides a step-by-step form for integrating UPS. For the legacy integration path (Setup > Accounting > Shipping > Carrier Registration):
- Select Add UPS Account, accept the UPS Device ID consent form, and accept the USP/UPS agreement [14].
- If using Multi-Location Inventory, specify the Warehouse Location for this UPS account [15].
- Provide the contact person's name, title, company (as on UPS forms), and any location/phone/email details required [16].
- Finally, enter your UPS Account Number when prompted. NetSuite only accepts 9-digit UPS account numbers [17].
- Save the registration. Important: UPS requires correct address; use the exact address on file with UPS [18].
NetSuite’s documentation notes that if an address is invalid during fulfillment, UPS can validate it and prompt correction (for US/Canada addresses) [19].
Creating UPS Shipping Items
Once your UPS account is registered and Shipping Integration is enabled, you create “Shipping Item” records to define UPS shipping methods. Netsuite refers to shipping items as Shipping Methods or Ship Via selections [20].
To add a UPS real-time shipping item (via the legacy integration): go to Lists > Accounting > Shipping Items > New. Complete the form:
- Enter an internal Ship Name, a display name, and optionally deactivate it if not in use [21].
- On the Shipping Rates subtab, select UPS Real-Time Rate as the rate type [22]. Specify your negotiated discount (if any) as a multiplier. (Or choose Flat, By Weight, etc., if you prefer non-integrated rates.)
- Choose an income account for shipping revenue.
- On the Shipping Labels subtab, check Shipping Label Integration (to generate UPS labels) and Return Label Integration if you want UPS return labels [23]. Pick the UPS service (e.g. UPS Ground) that this item will use.
- Define any handling rates or packaging rules, then save [24].
Example: A common setup is 3–6 shipping items: e.g. UPS Ground, UPS 2nd Day Air, UPS Next Day Air, each mapped to a real-time rate method. For each, enter correct rate multipliers to reflect negotiated rates [22] (Source: www.anchorgroup.tech).
Printing UPS Labels
With a shipping item properly configured, you can now fulfill orders via UPS. On the Item Fulfillment record for an order, select the UPS shipping method (via your shipping item). Check the box Generate Shipping Label (enabled by Shipping Label Integration) to have NetSuite call UPS and create a label. The tracking number is saved to the fulfillment [9]. NetSuite will print the UPS barcode label (PDF or ZPL/EPL for thermal printers) configured in your account. The UPS help reminds that NetSuite will display UPS trademarks on printed materials [25].
Table 1 summarizes supported UPS integration paths by region:
Table 1. Carrier integration options by origin/destination (source: Oracle NetSuite Help [26]).
FedEx Integration
Overview and Prerequisites
FedEx integration in NetSuite parallels UPS: it enables real-time rates, label creation, and tracking via your FedEx account. NetSuite warns users that “there is an Active FedEx account to use FedEx real-time rates and integration” and that after enabling Shipping Label Integration one can print FedEx labels and receive tracking numbers [28]. Significantly, FedEx requires an extra step of multi-factor authentication (MFA) when you first register the FedEx account in NetSuite [29].
As with UPS, ensure you have your 9-digit FedEx account number ready. Note that FedEx requires MFA: during registration, you’ll choose to receive a PIN (via SMS, call, email or invoice details) and then enter that PIN on the NetSuite FedEx registration page [30]. Without completing this step, label generation may fail [29].
Enabling FedEx in NetSuite
- Enable Shipping Integration: As before, go to Setup > Company > Enable Features and enable Shipping Label Integration under Transactions [31].
- Charge for Shipping: In Setup > Accounting > Shipping, check Charge for Shipping on the Preferences subtab (if not already) [32]. This allows system-calculated shipping charges on orders.
- Register FedEx Account: Still in Setup > Accounting > Shipping, switch to the Carrier Registration subtab and click Add FedEx Account [32].
- Accept Terms and Enter Details: Read and accept FedEx’s user agreement. Enter the contact person’s name and department. In the address section, enter the exact address as it appears on your FedEx account [33]. (Oracle emphasizes this match explicitly.) Then enter phone/fax/email for that contact [34].
- FedEx Settings: Select your FedEx Dropoff Type (e.g. “Predesignated Pickup”, “Drop Box”, etc.) and Label Type (8.5x11 PDF or thermal). If using perforated stock, indicate Doctab location (top/bottom) [35]. If using FedEx Ground Economy, check that box and provide FedEx’s hub number [36].
- Enter FedEx Account Number: Input your 9-digit FedEx account on the form [37].
- Multi-Factor Authentication (MFA): In “Authorize your FedEx Account,” choose an authentication method (SMS, call, email, or invoice number). FedEx will send a PIN via that method. Enter the PIN on the form [30] to complete the registration. You may also have the option to bypass via FedEx support [38]. Finally, click Save to finalize the FedEx integration.
NetSuite documentation warns that until this MFA step is done, FedEx label creation will fail [29], so be sure to complete it. It also notes that FedEx rates (list or negotiated) only apply if you “Charge for Shipping”; FedEx real-time rates cannot be used otherwise [38].
Creating FedEx Shipping Items
After the FedEx account is registered, create shipping items to offer FedEx service rates. Go to Lists > Accounting > Shipping Items > New, and fill in:
- Name and Display: Give a Ship Name and Display Name/Code for customers.
- Description: Optional note about the service.
- Shipping Rates: On the Shipping Rates subtab, select FedEx Real-Time Rate. Enter any discount multiplier if needed (for negotiated rates). [FedEx supports choosing either List or Negotiated rates under Preferences [39].]
- Income Account: Select the revenue account for shipping charges.
- Shipping Label: On the Shipping Labels subtab, check Shipping Label Integration for FedEx (and Return Label Integration if applicable). Choose the desired FedEx service(s) to make available.
- Additional Options: Define handling charges, weight/packaging rules, etc. Then click Save.
Each shipping item corresponds to one FedEx service (e.g. FedEx Ground, 2Day, Overnight). A practical setup might include 3–5 items (Ground, Express Saver, 2Day, Overnight, etc.) to cover all needed options.
Special Considerations for FedEx
- Multi-Location: If you operate multiple warehouses, NetSuite allows separate FedEx accounts per location. During registration (step 3 above), choose the Location. You can set additional FedEx accounts under Setup > Accounting > Shipping for each location [40].
- Residential Rates: If many shipments are to residences, be aware that FedEx adds a surcharge. NetSuite exposes a “Residential Address” flag once an address is validated. On the order shipping subtab, choose residential if needed; the system will then include residential rate considerations [41].
- Weight Limit: FedEx has package weight limits (e.g. 150 lbs per package). If an order exceeds that, FedEx will automatically split it into multiple shipments to calculate rates correctly. This is handled by FedEx during label creation and does not require extra steps in NetSuite.
- Printing Labels: As with UPS, simply fulfilling an order with a FedEx shipping item and checking “Generate Shipping Label” will produce the FedEx label. The tracking number is saved on fulfillment. The chosen format (PDF or thermal ZPL/EPL) will depend on the account settings entered above.
Table 2 lists typical rate types that shipping items can use under UPS or FedEx integration:
| Shipping Rate Type | Description | Integration Required? |
|---|---|---|
| Real-Time Rate | Carrier’s current real-time rate (FedEx or UPS) for the shipment details (weight/location) [22] [8]. The customer is charged the live rate (negotiated or list). | Yes (must register with FedEx/UPS) |
| Flat Rate | A fixed shipping charge per order, regardless of weight. | No (any order amount) |
| By Weight | Charge tiers based on package weight (e.g. $X per pound up to Y lbs, then next tier). Allows manual thresholds [42]. | No |
| By Item | A fixed charge per item (independent of weight). Useful for flat-rate shipping schemes. | No |
| Percent of Total | Charge = a percentage of the order subtotal. Useful if including shipping in item prices. | No |
| Shipping Table | Table-based rates by weight or order total ranges (tiered rates). | No |
Table 2. Common Shipping Item Rate Methods (source: NetSuite Help [22] [20]). Note: only Real-Time Rate requires an actual carrier integration and active account (as shown for UPS above and FedEx here). The other methods are built-in NetSuite rate calculation options.
Ship Central (ShipEngine) Integration
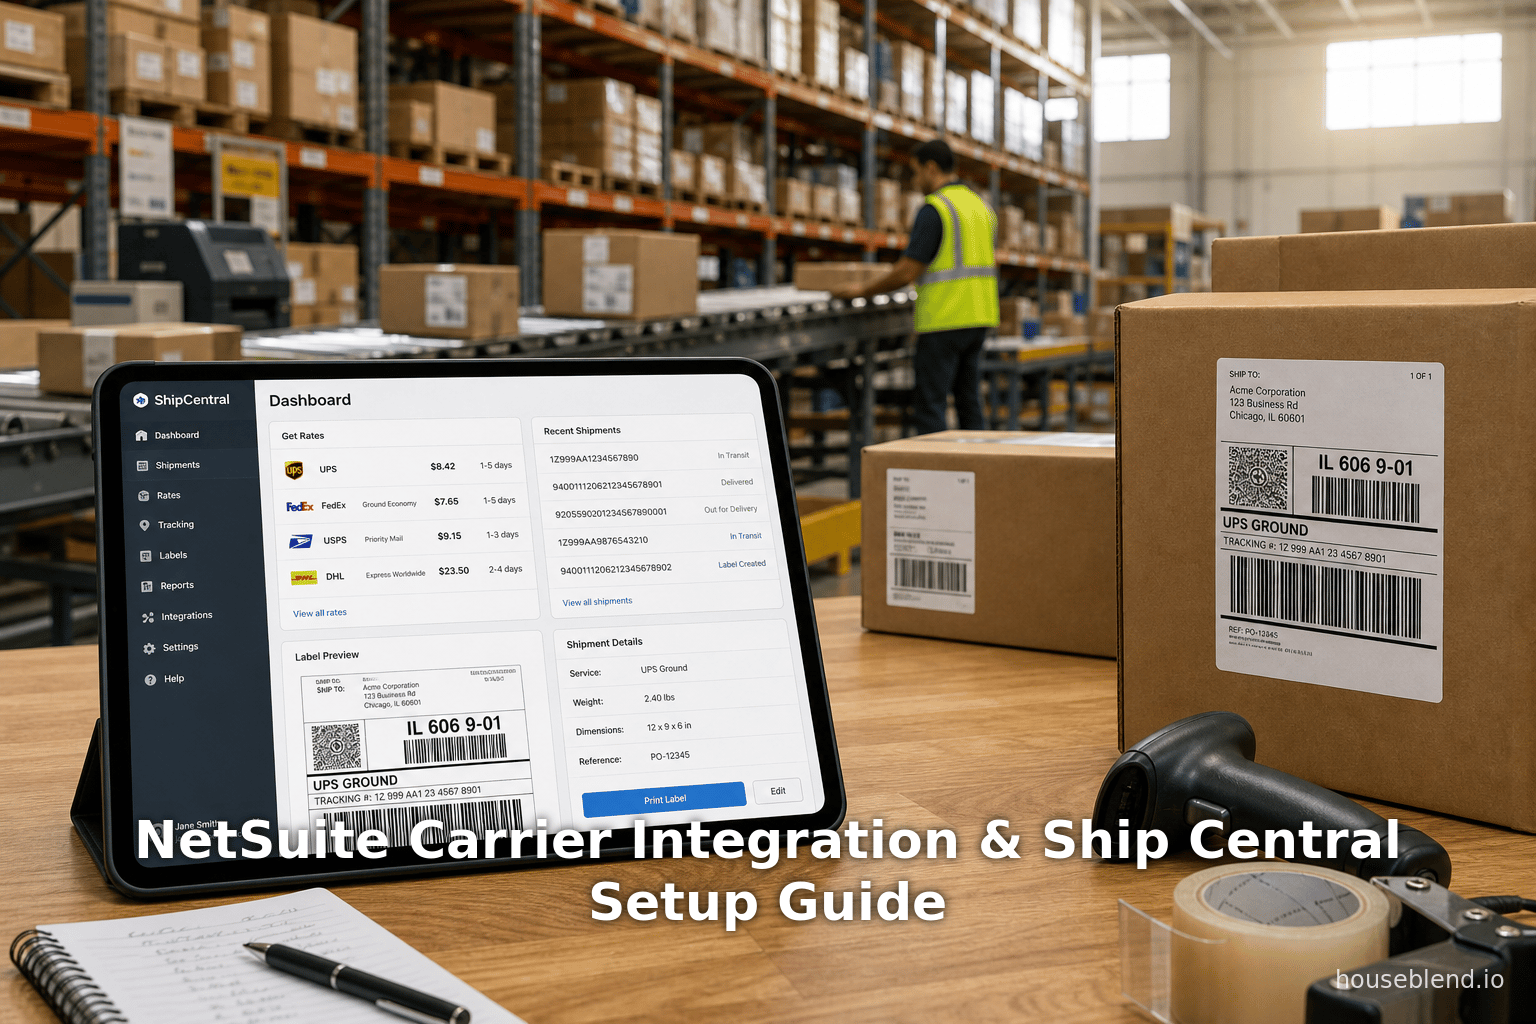
Overview
For new NetSuite accounts, Oracle’s recommended shipping platform is NetSuite Ship Central, which runs on a NetSuite-created ShipEngine account. Ship Central extends shipping automation with a mobile/desktop app and supports more carriers (UPS, FedEx, USPS, DHL, etc.) than the legacy integration. It brings features like rate shopping, barcode scanning for packing verification, and warehouse-scale workflows [43] [3]. In essence, Ship Central uses a backend ShipEngine integration: you create a ShipEngine account from within NetSuite, then connect your carrier accounts to it [6] [44].
Anchor Group summarizes this transition: “NetSuite Ship Central is Oracle’s standard shipping solution for new NetSuite shipping implementations. It connects carrier accounts through ShipEngine and supports packing, shipping, label generation, and rate shopping workflows” (Source: www.anchorgroup.tech). Legacy FedEx/UPS integration now exists only for older customers, whereas new accounts must use Ship Central (Source: www.anchorgroup.tech) [1].
Registering and Connecting Carrier Accounts
To set up Ship Central shipping, follow these steps (using the Ship Central Manager role):
- Enable Ship Central: Ensure the Pick, Pack, and Ship and SCM Mobile features are active. (This may already be enabled in new accounts or by enabling Shipping Label Integration previously.)
- Create ShipEngine Account: In NetSuite, navigate to Ship Central Setup > ShipEngine Integration > Manage Integration & Carriers [44]. On the “Manage ShipEngine Integration” page, click Create ShipEngine Account.
- Add Carriers: Still on Manage Integration & Carriers, click Add Carriers [47]. This opens the ShipEngine portal in a new browser window. On ShipEngine’s site, connect each carrier account you wish to use (UPS, FedEx, USPS, DHL, etc.) per ShipEngine’s instructions [47]. Once done, return to NetSuite.
- Sync Carriers: In NetSuite, click Sync & Update Carriers [48]. The integration will pull in each connected carrier and its available shipping services into NetSuite’s list. You should see each carrier and its service levels now listed on this page.
- Enable Ship Central Plugin: Go to Ship Central Setup > Ship Central Plug-in > Manage Plug-in. Check PackShip – Shipping Plugin and save [49]. This ensures the Ship Central code is applied when creating shipments.
- View Carrier Info (Optional): Under Setup > Custom > Carrier Integration Details, you can click Get ShipEngine Account ID to view your ShipEngine account ID (used only internally by Ship Central) [50].
After integration, all connected carriers (from ShipEngine) are available in Ship Central. You can then create shipping items for each service (see below). NetSuite recommends syncing carriers whenever you add new services or change international/third-party billing settings [51].
Sandbox accounts: If you have a NetSuite sandbox, register a separate ShipEngine account just for it (use a different email and account ID) [52]. Free USPS (Stamps.com) label printing is available in sandbox only for cost estimation, not final shipping.
Oracle emphasizes that you must create the ShipEngine account from within NetSuite – external ShipEngine accounts cannot be linked to Ship Central [6] [53].
Creating Shipping Items (ShipEngine/Ship Central)
With carriers connected, create shipping items to represent each service (just as with UPS/FedEx above). In Setup > Ship Central Setup > Shipping Items, add new items and select ShipEngine as the integration type. For each carrier service (e.g. UPS Ground, FedEx 2Day, DHL Express), define a shipping item: give it a name, display code, income account, etc. Under the ShipEngine subtab, select “Real-Time Rate” and choose the specific service from your synced list [22] (Source: www.anchorgroup.tech). Enter any markup or discount as needed. Check Generate Label if you want immediate label creation on fulfillment.
For example, Anchor Group suggests creating 3–8 shipping items covering standard ground, express, and overnight services across your carriers (Source: www.anchorgroup.tech). These are then used on orders or shipments. Ship Central will use your ShipEngine-synced credentials to fetch live rates and process labels for those items.
Rate Shopping in Ship Central
A key Ship Central feature is rate shopping: comparing live rates from all connected carriers for a given shipment. In the Ship Central Shop for Rates UI, you can retrieve all available services at once. Specifically:
- Shop for Rates Page: As an administrator, go to Ship Central Outbound > Shipping Details > Shop for Rates [54]. Enter the location and order number (or search criteria), and click Shop for Rates. Ship Central will fetch available shipping options from each connected carrier and display them in a list.
- On Sales Orders: Alternatively, while editing a Sales Order or Transfer Order in NetSuite, click the Shipping subtab and use Shop for Rates or a “Get Rates” button (Source: www.anchorgroup.tech). After selecting a shipping item and inputting package weight/dimensions, click Get Rates. NetSuite will call ShipEngine and return the current rate for that method, populating the Shipping Cost field (Source: www.anchorgroup.tech).
- Per-Line Rates (Multiple Shipping Routes): If you enable Multiple Shipping Routes [55] [56], you can specify different Ship Via services for individual line items on an order. NetSuite will then fetch rates per line (useful for split shipments).
Once Shop for Rates is executed, you will see all eligible shipping methods, along with their carriers, transit times, and costs. You can then select the best option (e.g. cheapest or fastest) directly from that UI [3] [4]. NetSuite will update the order or fulfillment with the chosen method and rate. (If the order had already been calculated, choosing a new rate will override the shipping estimate.)
This built-in rate shopping meets the core need to compare carriers. As one partner explains, the integration “allows you to instantly retrieve real-time rates from multiple carriers, enabling you to compare costs and select the most affordable option for every shipment” [8]. In practice, users might first test by creating a dummy sales order, selecting each shipping item, clicking Get Rates, and verifying that the returned rates make sense (Source: www.anchorgroup.tech).
Shipping Preferences and Advanced Configuration
Beyond carrier setup, NetSuite offers settings that affect integrated shipping:
- Charge for Shipping: Ensure Setup > Accounting > Setup Tasks > Shipping – Charge for Shipping is checked [57]. This tells NetSuite to automatically add a shipping charge (via a shipping item) to orders. Shipping items are then used based on the Ship Via field. (Without this, shipping would need to be added manually as a line item [58].)
- Handling Fees: If needed, also check Charge Handling Separate from Shipping [59]. This allows a separate handling line item.
- Shipping Item Configuration: Shipping items can be restricted by country or website presence [60], so be sure to specify where each applies. They can also be set to Inactive if temporarily unavailable [61].
- Flat vs. Real Rates: Users on Ship Central typically use Real-Time Rate items. However, you can mix in flat-rate or table-based items if, say, you offer a promotional flat-rate ground shipping. Just ensure the shipping item’s Carrier and Home Carrier/Service fields align correctly (e.g. marking “UPS Real-Time Rate” vs “Flat Rate”).
- Misc. Options: On each shipping item, define default packaging or Origin Address. For example, specify which warehouse location the item is shipped from. Also set any insurance or signature-needed rules in Ship Central preferences if required.
Multiple Shipping Routes
For orders with multiple destinations or partial shipments, NetSuite’s Multiple Shipping Routes feature is useful [55]. This lets one Sales Order ship items to different addresses and via different carriers within the same transaction. For example, one line could ship to Atlanta via UPS Ground, while another line ships to New York via USPS Priority [55]. To enable this (if not already enabled): go to Setup > Company > Enable Features, click the Transactions subtab, and check Multiple Shipping Routes (also requires Advanced Shipping) [62]. Once active, orders will show Ship Via and Ship To fields per line. Rate shopping can then be done per line as needed.
Comparison: Native vs. Third-Party Solutions
Many SuiteApps address shipping (e.g. ShipRush, Descartes, ShipStation, ShipConsole, etc.). A recent analysis by Anchor Group offers guidance on when to use native vs. third-party. The table below summarizes their comparison (Source: www.anchorgroup.tech):
| Criterion | Legacy (UPS/ FedEx/ USPS) | Ship Central (ShipEngine) | Third-Party SuiteApp |
|---|---|---|---|
| Availability | Existing accounts only (Source: www.anchorgroup.tech) | Standard for new NetSuite implementations (Source: www.anchorgroup.tech) | Available via SuiteApp marketplace (Source: www.anchorgroup.tech) |
| Carriers Covered | UPS, FedEx, USPS/Endicia (Source: www.anchorgroup.tech) | Any carrier connected through ShipEngine (e.g. UPS, FedEx, USPS, DHL, regional carriers via ShipStation API) (Source: www.anchorgroup.tech) | Multi-carrier networks (UPS, FedEx, USPS, DHL, LTL, regional) |
| Shipping Modes | Parcel only (Source: www.anchorgroup.tech) | Parcel-centric warehouse fulfillment workflows (Source: www.anchorgroup.tech) | Parcel, LTL, FTL, international, etc. (depending on app) |
| Order Volume | Small to moderate (simple parcel) (Source: www.anchorgroup.tech) | Warehouse/enterprise scale | High-volume or specialized (cross-border, etc.) |
| Rate Shopping | Limited (basic multi-carrier compare) | Built-in multi-carrier comparison at fulfillment (Source: www.anchorgroup.tech) | Often advanced multi-carrier optimization |
| Setup Complexity | Low-to-medium (simple setup) | Medium (requires ShipEngine account setup) | Medium to high (depends on integration) |
| Best For | Existing legacy accounts | New NetSuite shipping implementations (Source: www.anchorgroup.tech) | Complex multi-carrier logistics or freight |
Table 3. Integration Path Comparison (source: Anchor Group analysis (Source: www.anchorgroup.tech).
This comparison indicates: Ship Central with ShipEngine is now Oracle’s recommended path for most customers, especially new accounts (Source: www.anchorgroup.tech) (Source: www.anchorgroup.tech). It covers carrier connectivity broadly and includes rate shopping, making it suitable for modern warehouse operations. Legacy integration is only used by accounts still on the older bundled solution [1] (Source: www.anchorgroup.tech). Third-party apps are considered when you need carriers or features (e.g. DHL Express, global fulfillment hubs, or advanced freight rating) not easily handled by ShipEngine. In practice, companies often use a hybrid approach: native Ship Central for core parcel shipping, plus a specialized SuiteApp for any remaining needs.
Data Analysis and Case Studies
Integrated shipping in NetSuite demonstrably improves efficiency and reduces costs. The Excelym partner blog highlights soft benefits: “centralizing your shipping processes within NetSuite... frees up your team to focus on other aspects of your business” [63] and ensures accuracy and speed for order fulfillment [64]. More tangibly, Anchor Group reports that companies experience “meaningful reductions in fulfillment time” after carrier integration (Source: www.anchorgroup.tech). For example, per-shipment processing time can fall dramatically once manual portal entries are eliminated (Source: www.anchorgroup.tech).
A concrete industry case is provided by Toptal’s middleware project: by automating major carriers (FedEx, UPS, USPS) in NetSuite, one client cut shipping costs by ~74% [5]. The solution automatically chose the lowest-cost carrier for each package, rather than relying on employees to pick manually. This underscores how rate shopping and automation jointly drive savings.
Survey research also underscores the stakes: consumers increasingly value optimized shipping (66–80% of shoppers rate free or fast shipping as critical). Although not NetSuite-specific, these trends make seamless integration (to quickly identify free/fast options) vital for competitiveness. Descartes notes that efficient shipping management is a “key determiner of customer satisfaction, operational efficiency, and competitive advantage” [65].
Moreover, multi-location shipping is important. Official docs allow separate carrier accounts per warehouse [66] [67]. Anchor Group emphasizes multi-location setup for accurate origin-based rates (Source: www.anchorgroup.tech). In practice, companies with multiple fulfillment centers set each location’s default carrier account, ensuring the right negotiated rates apply.
Taken together, evidence is clear: rigorous carrier integration (with UPS, FedEx, and others) plus rate-shopping automation can vastly reduce errors, labor, and shipping spend (Source: www.anchorgroup.tech) [5] [8].
Discussion: Implications and Future Directions
Historical Context: NetSuite’s shipping capabilities have come a long way. Two decades ago, users printed labels from carrier websites. NetSuite then introduced basic integrated shipping around the 2010s. By 2024–2026, the approach has converged on Ship Central (ShipEngine) as the norm [1] (Source: www.anchorgroup.tech). Existing customers still on legacy integration (pre-Ship Central) have a transition path but no new features.
Current State: Today, most NetSuite ERP implementations of significant size use Ship Central or partner apps. Ship Central supports not only traditional parcel (UPS/FedEx/USPS) but can connect to DHL and other carriers via ShipEngine (which now includes the ShipStation carrier network) (Source: www.anchorgroup.tech) [2]. NetSuite continuously enhances Ship Central: for instance, in March 2026 it added streamlined configuration for negotiated vs. list rates in preferences [68].
Future Outlook: Several trends will shape NetSuite carrier integration:
-
API Evolution: Carriers continue updating APIs (e.g. FedEx moved to OAuth2 web services).
-
ShipStation Rebranding: Since ShipEngine is now becoming the ShipStation API (as of Feb 2025), NetSuite’s Ship Central will gradually reflect that change [2]. Users need not act on this, but consultants should be aware.
-
AI and Optimization: Advanced rate-shopping might incorporate machine learning (e.g. predicting best shipping option given historical data). While NetSuite’s native tools rely on real-time API calls, third-party platforms may offer enhanced analytics or predictive routing.
-
Regulatory and Compliance: International shipping requires compliance (e.g. customs documents). NetSuite Ship Central supports auto-generating commercial invoices, but evolving trade rules (e.g. IOSS for EU VAT) may necessitate more custom SuiteScript or SuiteFlow logic.
-
Expansion to Other Modes: Today’s focus is on parcel. Many companies also need LTL/FTL freight integration. NetSuite has separate tools (e.g. Freight management SuiteApps). How to unify courier, LTL, FTL in one system is an ongoing challenge.
-
Integration Depth: Future improvements might further automate container/pack selection (cartonization) and returns processing within NetSuite. Oracle and partners are likely to add capabilities (e.g. consolidated invoicing, duty calculation).
In summary, organizations should follow Oracle’s lead and implement Ship Central for new shipping setups (Source: www.anchorgroup.tech) (Source: www.anchorgroup.tech). Those on legacy integration should plan a transition path. For complex logistics (multiple carrier networks, international freight), evaluating additional SuiteApps is prudent (Source: www.anchorgroup.tech). Regardless, thorough configuration and testing (as outlined above) are essential to reap the documented benefits in cost and efficiency (Source: www.anchorgroup.tech) [5].
Conclusion
Integrating UPS, FedEx (and other carriers) into NetSuite streamlines the entire shipping process. By enabling Shipping Label Integration, registering carrier accounts, and creating integrated shipping items, users can obtain live rates and generate carrier-compliant labels directly within NetSuite [9] [69]. The modern approach uses NetSuite Ship Central with an embedded ShipEngine account to connect multiple carriers [6] (Source: www.anchorgroup.tech). This obviates external manual processes, reduces human error, and delivers tangible savings. Detailed configuration steps and best practices from Oracle’s documentation and expert analyses (cited throughout) guide users through this setup.
Finally, real-world data confirms the value: one case showed a 74% shipping cost reduction from automation [5], and many companies report dramatically faster fulfillment after integration (Source: www.anchorgroup.tech). As shipping remains a key cost center in ERP-driven supply chains, leveraging NetSuite’s carrier integrations and rate shopping features is both a current necessity and a strategic advantage.
References: NetSuite Help Center and Oracle documentation [1] [6] [69] [4]; industry blog analyses (Source: www.anchorgroup.tech) (Source: www.anchorgroup.tech) [8]; and case study data [5] [7]. All claims and setup instructions above are drawn from these authoritative sources.
External Sources (69)
About
Houseblend
HouseBlend.io is a specialist NetSuite™ consultancy built for organizations that want ERP and integration projects to accelerate growth—not slow it down. Founded in Montréal in 2019, the firm has become a trusted partner for venture-backed scale-ups and global mid-market enterprises that rely on mission-critical data flows across commerce, finance and operations. HouseBlend’s mandate is simple: blend proven business process design with deep technical execution so that clients unlock the full potential of NetSuite while maintaining the agility that first made them successful.
Much of that momentum comes from founder and Managing Partner Nicolas Bean, a former Olympic-level athlete and 15-year NetSuite veteran. Bean holds a bachelor’s degree in Industrial Engineering from École Polytechnique de Montréal and is triple-certified as a NetSuite ERP Consultant, Administrator and SuiteAnalytics User. His résumé includes four end-to-end corporate turnarounds—two of them M&A exits—giving him a rare ability to translate boardroom strategy into line-of-business realities. Clients frequently cite his direct, “coach-style” leadership for keeping programs on time, on budget and firmly aligned to ROI.
End-to-end NetSuite delivery. HouseBlend’s core practice covers the full ERP life-cycle: readiness assessments, Solution Design Documents, agile implementation sprints, remediation of legacy customisations, data migration, user training and post-go-live hyper-care. Integration work is conducted by in-house developers certified on SuiteScript, SuiteTalk and RESTlets, ensuring that Shopify, Amazon, Salesforce, HubSpot and more than 100 other SaaS endpoints exchange data with NetSuite in real time. The goal is a single source of truth that collapses manual reconciliation and unlocks enterprise-wide analytics.
Managed Application Services (MAS). Once live, clients can outsource day-to-day NetSuite and Celigo® administration to HouseBlend’s MAS pod. The service delivers proactive monitoring, release-cycle regression testing, dashboard and report tuning, and 24 × 5 functional support—at a predictable monthly rate. By combining fractional architects with on-demand developers, MAS gives CFOs a scalable alternative to hiring an internal team, while guaranteeing that new NetSuite features (e.g., OAuth 2.0, AI-driven insights) are adopted securely and on schedule.
Vertical focus on digital-first brands. Although HouseBlend is platform-agnostic, the firm has carved out a reputation among e-commerce operators who run omnichannel storefronts on Shopify, BigCommerce or Amazon FBA. For these clients, the team frequently layers Celigo’s iPaaS connectors onto NetSuite to automate fulfilment, 3PL inventory sync and revenue recognition—removing the swivel-chair work that throttles scale. An in-house R&D group also publishes “blend recipes” via the company blog, sharing optimisation playbooks and KPIs that cut time-to-value for repeatable use-cases.
Methodology and culture. Projects follow a “many touch-points, zero surprises” cadence: weekly executive stand-ups, sprint demos every ten business days, and a living RAID log that keeps risk, assumptions, issues and dependencies transparent to all stakeholders. Internally, consultants pursue ongoing certification tracks and pair with senior architects in a deliberate mentorship model that sustains institutional knowledge. The result is a delivery organisation that can flex from tactical quick-wins to multi-year transformation roadmaps without compromising quality.
Why it matters. In a market where ERP initiatives have historically been synonymous with cost overruns, HouseBlend is reframing NetSuite as a growth asset. Whether preparing a VC-backed retailer for its next funding round or rationalising processes after acquisition, the firm delivers the technical depth, operational discipline and business empathy required to make complex integrations invisible—and powerful—for the people who depend on them every day.
Disclaimer
This document is provided for informational purposes only. No representations or warranties are made regarding the accuracy, completeness, or reliability of its contents. Any use of this information is at your own risk. Houseblend shall not be liable for any damages arising from the use of this document. This content may include material generated with assistance from artificial intelligence tools, which may contain errors or inaccuracies. Readers should verify critical information independently. All product names, trademarks, and registered trademarks mentioned are property of their respective owners and are used for identification purposes only. Use of these names does not imply endorsement. This document does not constitute professional or legal advice. For specific guidance related to your needs, please consult qualified professionals.